In this post I will share experiments on machine learning stock prediction with LSTM and Keras with one step ahead. I tried to do first multiple steps ahead with few techniques described in the papers on the web. But I discovered that I need fully understand and test the simplest model – prediction for one step ahead. So I put here the example of prediction of stock price data time series for one next step.
Preparing Data for Neural Network Prediction
Our first task is feed the data into LSTM. Our data is stock price data time series that were downloaded from the web.
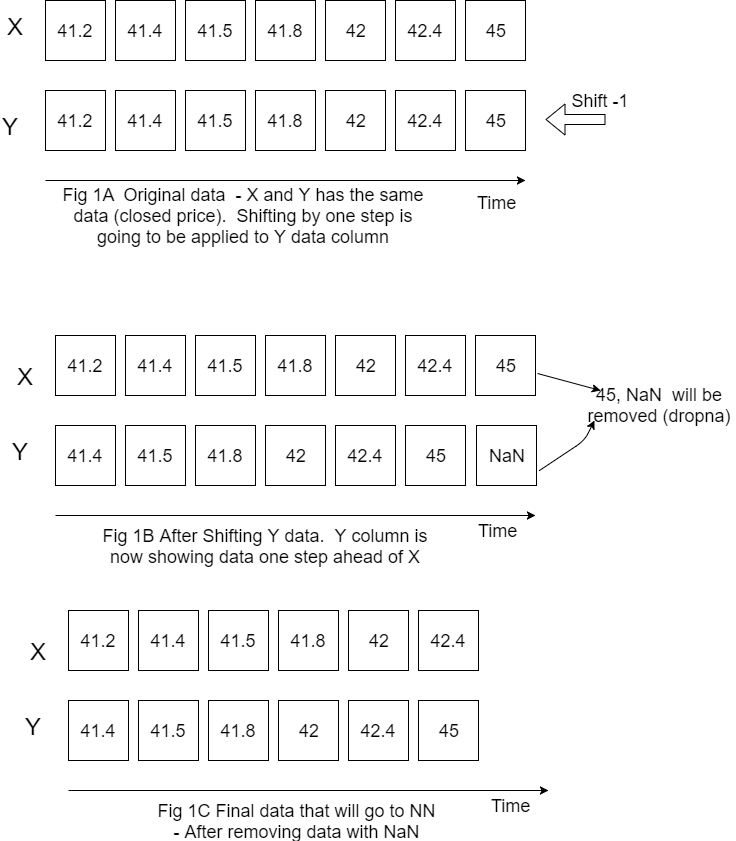
Our interest is closed price for the next day so target variable will be closed price but shifted to left (back) by one step.
Figure below is showing how do we prepare X, Y data.
Please note that I put X Y horizontally for convenience but still calling X, Y as columns.
Also on this figure only one variable (closed price) is showed for X but in the code it is actually more than one variable (it is closed price, open price, volume and high price).

Now we have the data that we can feed for LSTM neural network prediction. Before doing this we need also do the following things:
1. Decide how many data we want to use. For example if we have data for 10 years but want use only last 200 rows of data we would need specify start point because the most recent data will be in the end.
#how many data we will use
# (should not be more than dataset length )
data_to_use= 100

# number of training data
# should be less than data_to_use
train_end =70


total_data=len(data_csv)

#most recent data is in the end
#so need offset
start=total_data - data_to_use
2. Rescale (normalize) data as below. Here feature_range is tuple (min, max), default=(0, 1) is desired range of transformed data. [1]
scaler_x = preprocessing.MinMaxScaler ( feature_range =( -1, 1))
x = np. array (x).reshape ((len( x) ,len(cols)))
x = scaler_x.fit_transform (x)


scaler_y = preprocessing. MinMaxScaler ( feature_range =( -1, 1))
y = np.array (y).reshape ((len( y), 1))
y = scaler_y.fit_transform (y)
3. Divide data into training and testing set.
x_train = x [0: train_end,]
x_test = x[ train_end +1:len(x),]
y_train = y [0: train_end]
y_test = y[ train_end +1:len(y)]
Building and Running LSTM
Now we need to define our LSTM neural network layers , parameters and run neural network to see how it works.
fit1 = Sequential ()
fit1.add (LSTM (  1000 , activation = 'tanh', inner_activation = 'hard_sigmoid' , input_shape =(len(cols), 1) ))
fit1.add(Dropout(0.2))
fit1.add (Dense (output_dim =1, activation = 'linear'))

fit1.compile (loss ="mean_squared_error" , optimizer = "adam")
fit1.fit (x_train, y_train, batch_size =16, nb_epoch =25, shuffle = False)
The first run was not good – prediction was way below actual.
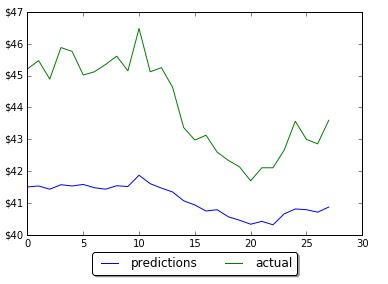
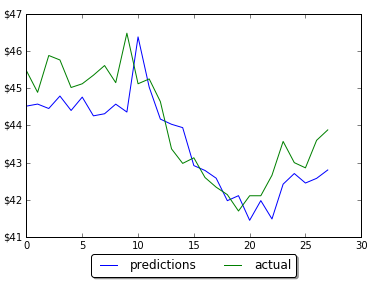
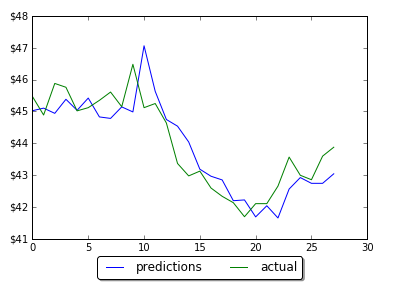
However by changing the number of neurons in LSTM neural network prediction code, it was possible to improve MSE and get predictions much closer to actual data. Below are screenshots of plots of prediction and actual data for LSTM with 5, 60 and 1000 neurons. Note that the plot is showing only testing data. Training data is not shown on the plots. Also you can find below the data for MSE and number of neurons. As the number neorons in LSTM layer is changing there were 2 minimums (one around 100 neurons and another around 1000 neurons)


LSTM 5
in train MSE = 0.0475
in test MSE = 0.2714831660102521
LSTM 60
in train MSE = 0.0127
in test MSE = 0.02227417068206705
LSTM 100
in train MSE = 0.0126
in test MSE = 0.018672733913263073
LSTM 200
in train MSE = 0.0133
in test MSE = 0.020082660237026824
LSTM 900
in train MSE = 0.0103
in test MSE = 0.015546535929778267
LSTM 1000
in train MSE = 0.0104
in test MSE = 0.015037054958075455
LSTM 1100
in train MSE = 0.0113
in test MSE = 0.016363980411369994
Conclusion
The final LSTM was running with testing MSE 0.015 and accuracy 97%. This was obtained by changing number of neurons in LSTM. This example will serve as baseline for further possible improvements on machine learning stock prediction with LSTM. If you have any tips or anything else to add, please leave a comment the comment box. The full source code for LSTM neural network prediction can be found here
References
1. sklearn.preprocessing.MinMaxScaler
2. Keras documentation – RNN Layers
3. How to Reshape Input Data for Long Short-Term Memory Networks in Keras
4. Keras FAQ: Frequently Asked Keras Questions
5. Time Series Prediction with LSTM Recurrent Neural Networks in Python with Keras
6.Deep Time Series Forecasting with Python: An Intuitive Introduction to Deep Learning for Applied Time Series Modeling
7. Machine Learning Stock Prediction with LSTM and Keras – Python Source Code
You must be logged in to post a comment.